
After receiving some great feedback on my post, Debugging: Configure VS Code + Xdebug + PHPUnit, I had a few people ask me for some help configuring their Xdebug setup on their Laravel Homestead environments. Adding a virtual machine to the mix does add a bit of complexity, but the benefit of having a proper debugging environment far outweighs the initial legwork.
The following assumes that you have already installed Homestead for your project.
Enable Xdebug in Homestead
1. SSH into your homestead machine:
homestead ssh2. Enable Xdebug with Homestead's xon command:
xon3. Find your guest machine's gateway IP. This will be the IP Address that your guest machine can use to communicate with your host machine
netstat -rn | grep "^0.0.0.0 " | cut -d " " -f10The output I see on my Homestead machine is 10.0.2.2; just remember this for the next step.
4. Local xdebug.ini, the Xdebug config file:
php --ini | grep 'xdebug'My output shows the ini file at /etc/php/7.1/cli/conf.d/20-xdebug.ini
5. Configure Xdebug to use the gateway as the xdebug.remote_host value:
Edit the xdebug.ini file you just located:
sudo vim /etc/php/7.1/cli/conf.d/20-xdebug.iniAnd make sure the settings are set like this, appropriately for your gateway IP:
zend_extension=xdebug.soxdebug.remote_enable=1xdebug.remote_autostart=1xdebug.remote_host=10.0.2.27. Restart the PHP-FPM service
sudo service php7.1-fpm restartVSCode Setup
1. Install the PHP Debug plugin
2. Open the debug panel
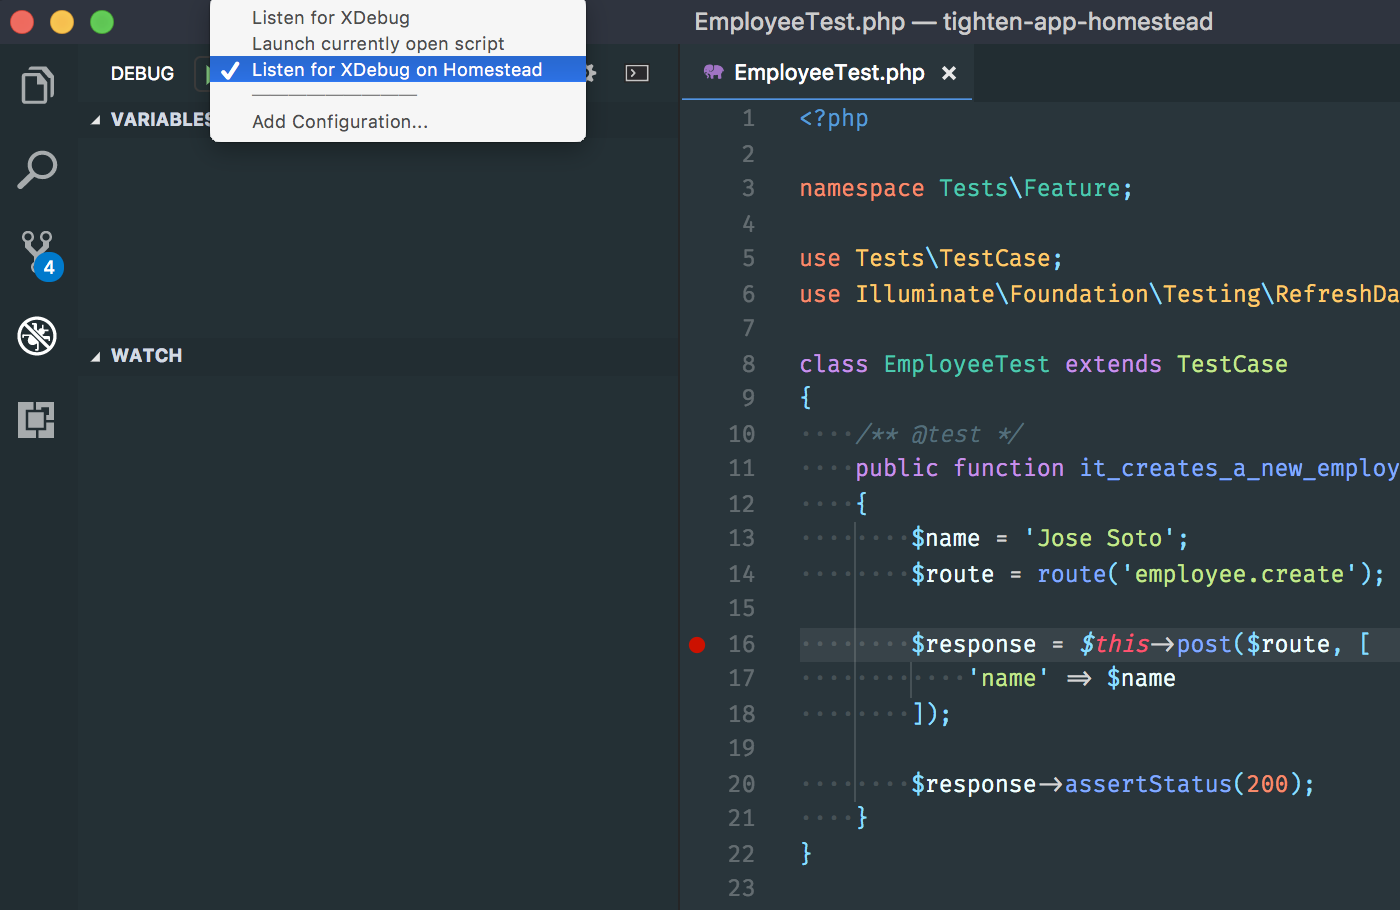
3. Click on the "config" button (the cogwheel) and select PHP
4. Modify the default launch.json file:
Make sure to edit this file for your correct localSourceRoot and serverSourceRoot:
{ "version": "0.2.0", "configurations": [ { "name": "Listen for XDebug", "type": "php", "request": "launch", "port": 9000 }, { "name": "Launch currently open script", "type": "php", "request": "launch", "program": "${file}", "cwd": "${fileDirname}", "port": 9000 }, { "name": "Listen for XDebug on Homestead", "type": "php", "request": "launch", "pathMappings": { "/home/vagrant/Code/tighten-app-homestead": "/Users/jose/Code/tighten-app-homestead" }, "port": 9000 } ]}Here, we are adding a new configuration object that is the same as Listen for Xdebug, but we include the pathMappings values per the plugin's documenatation on Remote Host Debugging.
5. Open a PHPUnit test file and set a breakpoint using the debugger plugin.
6. Set the debugger to "Listen for XDebug on Homestead".
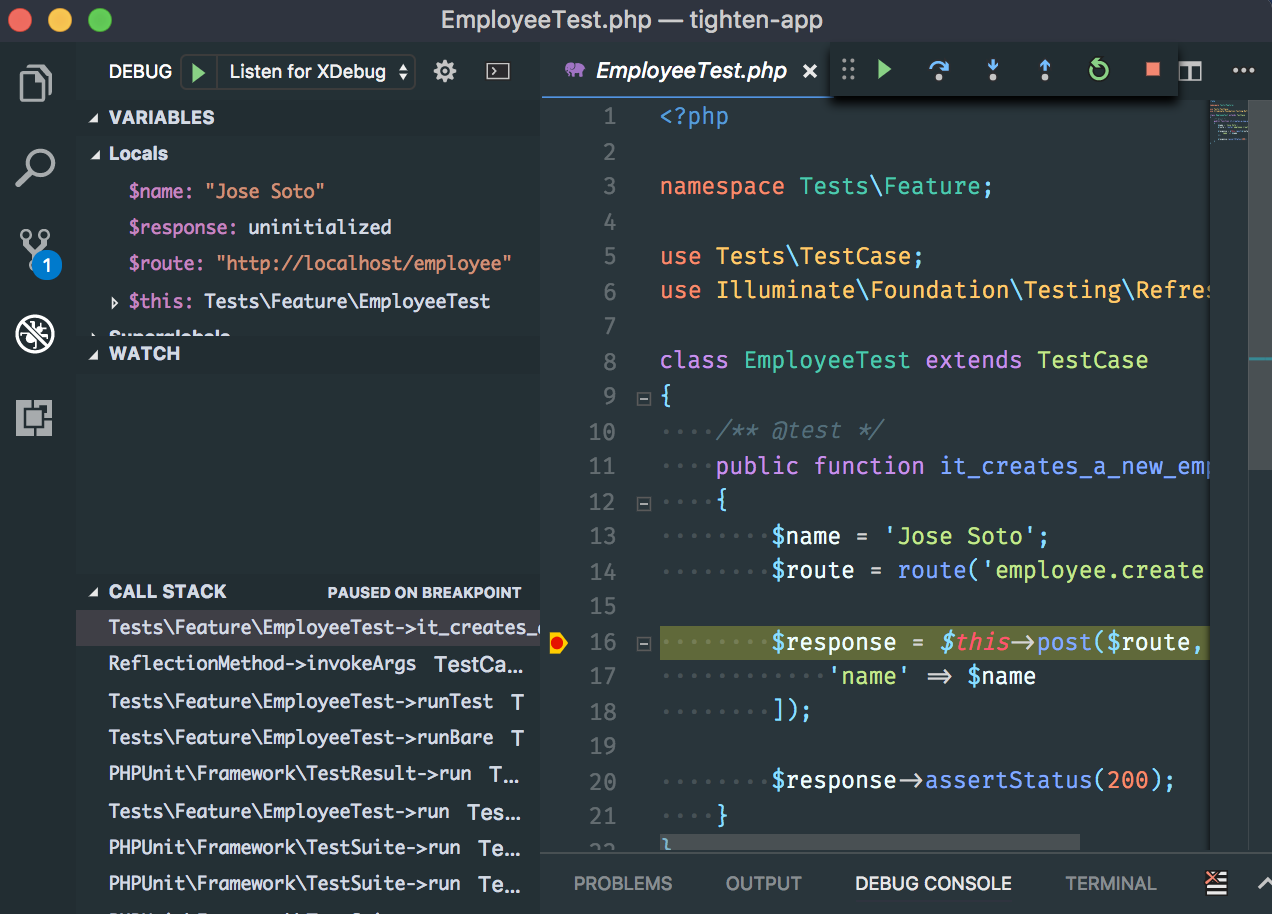
7. "Start Debugging" by clicking on the green arrow button.
This doesn't actually start the debugging process; instead, it starts a listener that will be triggered once you run the PHPUnit test.
You should now see a step toolbar with the blue arrow buttons greyed out:

Debug!
You're now ready to run your test from within your Homestead virtual machine:
phpunit --filter some_test_nameVisual Studio Code should display the first breakpoint, and the toolbar will allow you to step through your code.
A note on performance
Enabling Xdebug does come with a performance hit. If you no longer need to do any debugging, you can easily disable the Xdebug plugin by ssh-ing into your Homestead virtual machine and using the xoff command.
Happy Debugging!!
If this walkthrough has helped you get started with a proper debugging environment, or if you'd like to see a walkthrough for a specific environment, please hit us up on Twitter. We'd love to hear your feedback! Tweet @JoseCanHelp and @TightenCo.
Get our latest insights
in your inbox:
in your inbox:
Hey,
let’s talk.
let’s talk.